These pictures are proof positive that I am neither a food stylist nor a photographer. But the kiddos and I had fun creating our flag cake today. :)
Iced and ready to eat:

Surprise!

UPDATE: Directions can be found here.

AFTER: 
Found this candle holder at Goodwill last week (was the ONLY thing I found...pout). It was marked $3, but it had a pink tag and it was "pink tags are half price" day, so it was a whopping $1.50 plus tax. I'm not really a taper person, but figured I could make it work for something. I'm not a huge fan of the grapevine ball on top, but figured it was better than seeing the taper holder that I didn't bother trying fill or cover.
Sprayed with primer first, then two coats of glossy white. Sanded lightly, then brushed on and wiped off Minwax's Dark Walnut stain. One spray of clear coat, then let it dry overnight.

I went through my daughter's clothes this morning...swapping out winter for spring/summer. As I was getting a donation bag ready, I got a bit irritated that I was getting rid of things that she had only worn a handful of times, but that still fit her. I started looking at some of the shirts that she had and wondered if I could cut off the sleeves to get some additional wear out of them. Sewing with knit is not my thing, though. I know it's user error, but whenever I sew with knit, it stretches out my fabric and looks terrible. So sewing was out for me on this one! She did have a number of layered-look shirts, though, so I went after those with a pair of scissors. Now she has additional shirts in her wardrobe for spring & summer!

Here are the "leftover" sleeves. If your sewing machine doesn't hate knit, you can totally turn these into baby leg warmers in less than 10 minutes. Snip a little off the top to make them straight across, fold down for a hem and sew a straight seam. Easy peasy! :)

Dad:

Mom - I am NO artist:

Kid #1 (age 10) - he said this is a worm den:

Kid #2 (age 2):

I came home from work today to find them in the breakfast nook. Not exactly where I would have put them (I was thinking above the tv) nor in the "shape" I would have put them (I was thinking like one large square...two side by side with two underneath), BUT my husband participated in family art and was happy enough with them to hang them up by himself. So I'm happy too. :)
Daddy's is on the opposite wall, but here's a pic of the grouping he put together (Blogger is cutting off my pic, so you can click on it to see the whole grouping).

There are a couple of good things about this project. First, it was cheap...less than $6. I bought the cheapest canvases that Michael's had, plus I used a 40% off coupon. Second, whenever we get tired of the colors, we can paint over the canvases with white and start all over! Lastly, it was really nice to hang out as a family and do something artsy together. Makes a Mama smile. :)
This "tutorial" is pretty basic since I forgot to take pics of a few steps.
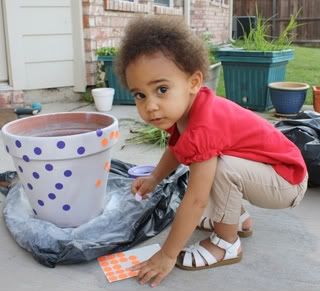
I started with a couple of terra cotta pots. One was new and one I rescued from the plant hospital (aka, the back porch). I sprayed them with water to get the dust and dirt off, then left them for about 30 minutes to dry.

Spray paint the pots white. I recommend paint, not primer. But that's what happens when you are in a hurry and apparently only look at the color of the cap. Oops.


Allow the white paint to dry thoroughly (give it at least 20 minutes...more if it's humid outside).
For the striped pot, I used painters tape and placed it on the pot in the general design that I wanted. For the polka dot pot, I used some left over garage sale stickers that were in my desk (this is where my kiddos got involved and any anal tendencies toward symmetry went out the window). You can get several hundred for a buck at the dollar store. After you apply your stickers or tape, rub over them with your finger to make sure the edges are stuck down really well or when you paint over them, it will go underneath and look messy. I had trouble with mine sticking...I'm not sure if it's because I used primer instead of paint or if it's because it was humid.as.hell outside.
Now spray over your pot again with your color of choice, black in this case. No pictures of a black pot because, well, because I didn't take any. :) Allow the paint to dry and spray it again, getting any spots you may have missed the first time around.
After the black paint has had a chance to dry (another fudge up here because I didn't let mine dry thoroughly and because I didn't wear gloves, I looked like I had been fingerprinted), peel off your tape and stickers. I added a couple of coats of clear coat to help protect my awesome paint job from the elements.


Lots of sticker shape and color combos would work here. My sister is a ladybug fan, so she may get one that is red with black dots. I'm thinking of doing a triple threat this weekend...yellow, pink and teal. I'll let you know how it turns out. :)

I was inspired by this post at Lil Blue Boo (Ashley's site is one of my faves to visit...she's incredibly talented). She made a set of bean bags that spell out her daughter's name. So cute!
So being inspired, I decided to make alphabet bean bags for my 2 year old. 5 minutes into the project, I decided the alphabet was going to be too much work. I wanted something that would only take me a couple of hours. A nap time project! At this point, I went from 26 beans bags to 10. The nap time guesstimate didn't work out, though. All together, including taking tutorial pics, it took me about 5 hours. It could have taken about 3, but you'll see where I used some optional steps.
For me, one of the best things about this project is that I only had to buy beans. All of my material was scrap.

You will need the following materials:
I cut my squares 6" x 6", but you can go as big or small as you like, depending on what you have available. So here's how I did mine. Hope the directions are easy to follow!
I started by printing off the numbers 0-9. I used a text box in Microsoft Word so that I could easily size the letters based on the size of my squares. I used Calibri font in bold and made my letters 3" high by 2" wide.
Next, I traced my letters onto some Wonder Under using a ball point pen (per their instructions). There are a couple of ways you can use Wonder Under. I didn't want to have to cut my numbers more than once, so I used the trace method. I traced my numbers onto the BUMPY side of the Wonder Under.


One you get all of the numbers traced, iron them, bumpy side of the Wonder Under facing down. Yes, you are now looking at the mirror image of your numbers.

Now you'll cut out your numbers. This is time consuming. If you are going to satin stitch these onto your bean bags, being precise isn't necessary, but if you're not planning to do that, then get it as close as you can. I tried very hard to cut just inside my pen line because I didn't know if the ink would have bled through to the white fabric (FYI, it did!). Here are the numbers all cut out!

Next, I cut my bags out of some polka dot fabric. I made my squares 6" x 6", but like I said above, you can make them any size (or better yet, any shape!) you want. For the numbers we are doing (0-9), you'll need to cut out two pieces for each bean bag. You'll wind up with 20 squares (it only looks like 10 in my photo, but the other matching color square is underneath). My fabrics didn't have a precise pattern to them, so I actually cut 4 layers of fabric at one time (this will go quickly if you have a sharp blade on your rotary cutter).


Before we get to sewing, there is one quick step remaining. We now need to iron the cut out numbers onto the fabric squares. At first, I had a hard time pulling the paper back of the numbers, but if you gently fold it (don't crease the fabric) in your fingers, it will pull apart and come off easily.

The Wonder Under directions say you're supposed to iron these on with a pressing cloth. Oops! :)


This particular step is totally optional. I chose to sew around the edges of the numbers because I know how hard my kids are on toys. They are not gentle giants. :) If you're going to sew around the edges, I have no tips for you. Just...good luck. It took me over an hour to sew around 10 numbers. If I had it to do over again, I MIGHT do it by hand with long running stitches or I might just use stencils and fabric paint and paint numbers on.


Once your numbers are on the fabric (whether you sew around them or not), it's time to start putting them together. Place right sides together, add a couple of pins, and sew around all four sides, leaving a 2-3" opening on one side. Trim your corners.

Next, turn your fabric right side out and poke out your corners so they are nice and square. I'm an advocate of ironing, so iron your right-side-out bags so the edges look pretty and crisp. :)
Now it's time to fill your bags with some sort of filler. I used 3/4 cup of pinto beans (you may want a little more or a little less), but you can use any type of bean, rice or the little balls that bean bags are normally filled with. The hole in the side of your bag is difficult to put beans through (unless you want to spend HOURS doing it one by one). I attempted to use my kitchen funnel, but the opening wasn't large enough for even one bean to go through. So I improvised...I tore off a small bit of a piece of paper and quickly taped together a funnel shape. Stick the funnel inside the hole and pour small handfulls of your beans in. My 10-year old helped with this part. He was very intent on not spilling the beans. :) You can barely see the funnel in this pic.


After you have filled all of your bags, top stitch all the way around, making sure the catch the edges of your opening on each bag. As you are sewing, you'll have to putz with the beans a bit to keep them out of the way. Believe me when I tell you that if your needle hits a bean, it's toast.

Ta da! All done! Commence playing. :)

On this blog, I do plan to show my imperfections, so here's today's insight: this could have taken WAY less time than I put into it. :) There were a couple of places where I could have saved a lot of time.
I hope you found this tutorial helpful. If you have any suggestions or comments, feel free to have at it in the Comments section! :)
Place the chicken breast pieces into the crock-pot. Combine salad dressing mix with water and pour over chicken. Cover and cook on low for 3-4 hours. In a small bowl, use a fork or whisk to mix together the softened cream cheese and soup. Stir in mushrooms, if desired. Cook another 2-3 hours on low. Add in cut broccoli pieces and cook for an additional hour...just until broccoli is tender enough to not fall apart. If you put the broccoli in with the cream cheese mixture? You'll just have a delicious mess on your hands. :) Serve over hot cooked noodles.
TIP: Usually, I have to add a bit more water to get it to a consistency that I like. Most of the time, I add 1/3 to 1/2 cup water when I put the broccoli in because I think it helps steam the broccoli better.
I usually serve with some buttered french bread and a small side salad. YUM!


My home? Not so pretty right now. In terms of decoration, there is very little. Not much to speak of in regards to things on the walls. I have lots of great intentions, but, honestly, very little follow-through (or $$ to follow through with!).
Confession #1: We have lived here for 4 years and there is still builder's "white" (it's really light tan, but nobody calls it builder's light tan!) on several of the walls in the public areas of the house.
What are public areas, you ask? In my house, we have areas where company is allowed to roam freely...and we have areas that are 100% off-limits. Because I would DIE if someone saw them. Like the master bedroom and bathroom. OFF-LIMITS. Seriously. That is the room that is last on the cleaning list every week. And if I said they were cleaned every week? I would be lying. So there. Now you have Confession #2.
Now for the good stuff. Pictures! Of my imperfect house! I will preface these by saying yes, I did pick up the toys from the living room floor. Yes, I did fold (and put away!) the mountain of clean laundry that perpetually lives on my loveseat and/or chair. Yes, my "sewing room" is also known as my dining room. Yes, I do hate that. Yes, I would love to kick my husband's junk out of the office and make that my sewing room. Yes, he is being rather stubborn about that. :)
My living room, from the entry hall.
My living room, again, from the vantage point of my sewing/dining room. I have a love/hate thing going on with the fireplace. I adored the rock when we first moved in, but now I don't know quite what to do with all of it.
This is my dining room. I think this part of the public areas will get the first semi-major makeover. The table and chairs are a hand-me-down from my dad. I don't really care for the color of them, but there are a TON of spindles on the chairs and the table has quite a bit of scroll-y stuffs. It would be a super pain to strip and stain. I am not a huge fan of painted tables, though. So either it will go in craigslist and the proceeds put toward a new set. Or I'll live with it for awhile longer. I'm guessing it will be the latter of the two. :)
Big-ish things are coming to the living room and dining room in the next 2-3 weeks. This will not be a DIY project. Instead of having WWIII in my house, we will pay out the hoo-ha for labor. I will definitely update as soon as it's complete.
Last, but not least, this is my entry hall. I think this could look fab with just a little color and a total re-do of that enormous art niche. This room may be the easiest of them all to work on, but I'm at a bit of a loss, so it will wait.
So there you go. Confessions of unclean bathrooms, unpainted walls and a total lack of creativity.


